Saturday, 13 April 2013

Assignment 3: Group Task

In Task 3 we are required to form and work together in small groups to explore technologies appropriate for teaching and learning. Again, a sign up sheet had been created and posted by our tutors on the LMS using Google Docs for us to form into groups as shown below.

Screenshot:Announcement group sign up

I was one of the first people to write my name onto the sheet. At the time, I had many questions and thoughts running through my mind. I thought this task was going to be difficult with many challenges. How was a group task for external students going to work?  What if no-one chooses to work with me? What if the other people in my group are lazy? How do we communicate? After reading the task requirements in our UILG guide I was still left with many questions.

We are required to all work on a Teacher Wiki Resource. What is a Wiki i thought? Is this not just a website?

We then had to decide on a teaching area of interest to us. Unfortunately, due to my commitments in finishing another assignment, I missed out on being a part of this conversation with my team members, who were very keen on making an early start to the task. They had decided to go with Health and Physical Education as our teaching area. Personally, I would have Art as our area of interest however, it may be nice to do something a little different for a change.


Wednesday, 10 April 2013

Jing instead of Grab

Since purchasing my Mac early this year and commencing studies in EDN113 I became aware that where as my old PC had a print screen option on the keyboard, Mac's do not. It took me a little while to figure out after beginning this unit that there is an application called 'Grab' installed on Mac's to do this function.  Grab can be found by going into Finder, clicking on the utilities folder under applications.

Grab is a application created by Apple that allows you to take a whole window screenshots, capture a marquee selection, a whole screen or a timed screen. 

I am finding that this option is rather inconvenient and hard to use.Initially you are  required to open the program from the applications menu to use it.

After completing Task one and starting on my first blog for Assignment 2 I was having problems with my screenshots appearing upside down or squished up so you could not read them. I was unaware of ever having this problem before in my previous blogs until going back and viewing my last blog entry ' Peer review complete' only to discover the screenshots were also unclear here too. I was gutted and annoyed that I hadn't doubled checked my blog after publishing and submitting for marking.

I was totally confused, what was different and why this was happening? I decided to email my tutor to see if they had a solution to this problem.  They asked  whether I could 'check the original file? do you have one called feedback r1.jpg?'(Dani, March,10,2013).

I checked the files that I was using to upload. There was the problem clear as day! They were saving as PNG files not JPG. Unfortunately, this means that because Grab does not allow an option to save as JPG each screenshot I take and want to use I have to re-open in Paintbrush and re-save as a JPG file. This is now resulting in me having multiple files of the same screenshot and is very time consuming. From now on I think I will be using Jing to capture my screencasts.


Saturday, 6 April 2013

Unable to upload my screencast to Weebly


I had nearly completed Task 2 today, and I was trying to upload my completed screencast to my Weebly site, but I was having difficulties. I spent many hours trying to resolve this problem by myself. I couldn't figure out what I was doing wrong. I had assumed it was just as easy as uploading a video onto your website, which I had done previously before...

I kept receiving an error message when clicking on the SWF flash icon that my 'File size exceeds the limit, upgrade now to the pro account'. 

My partner suggested that it might be worth looking at upgrading to a pro account if I were to be continuing to use Weebly as my Eportfolio throughout this semester. I looked at this option but then decided against it as it only allowed for 6 or 12 month contracts and I did not want to commit to this. 

I continued to problem solve, by illuminating the different ways I could possible get my screencast onto my site. It wasn't a You Tube video I know, but In desperation and through trial and error, thought I would try this also. Copying the URL link from Screencast.com into the YouTube video icon.This, as I was half expecting, was also unsuccessful. 

I knew somehow I could embed a document. I tried to copy the embed code, again from screencast.com, where my screencast was stored. This was also unsuccessful.  I was now getting extremely frustrated as I just wanted to get this up and finished onto my researcher page.

Why wasn't it working!?!

I tried to Google the problem in search for an answer but this seem to just lead me to paid solutions offered by Apple.

I had wasted so much time trying to resolve the issue by myself I decided to contact our unit coordinator who conveniently happened to be on Skype at the time. This was fantastic because I was able to get an immediate response to my query.  I am now glad that I was able to have this communication with my co ordinator as I dont think I would have been able to successful resolve this problem by myself.

25 minutes later, with the assistance of my unit coordinator, I was able solve this issue. I decided to share this discussion on the LMS with my peers, detailing how you can upload your screencast created with Jing onto a Weebly site incase others were experiencing the same issue.


Using Jing

I downloaded Jing onto my computer. This was a very easy process. Once I had downloaded Jing, I couldn't figure out where it was located on my computer, according to the tutorial demonstration it should show in the corner of my web browser as shown below. I soon figured out that I had to go into the application folder on my computer and open open Jing to begin with before it would automatically appear in my web browser.


I spent the majority of the afternoon experimenting with Jing, trying to create my screencast. I found it extremely difficult to begin with, trying to multi task and grasp the concept of speaking and explaining what I was doing at the same time as doing it on the computer screen. One downfall of Jing is that it only allows you to create a screencast video of up to 5 minutes. I found this limiting and was continually getting cut short part way through my demonstration. This became quite annoying and I was very close to considering trying to find an alternative technology. In the end after many hours, and approximately 10 attempts later I finally manage to complete a screencast that I was content with.

When creating some of my earlier screencasts I found that I had the problem of background noise in my screencast and had to try and find somewhere quiet to record.


Friday, 5 April 2013

Beginning My Screencast-Deleting a reference from my EndNote Library

Today I entered my chosen resource into my Endnote Library. This was relatively straight forward. I worked out that the website allowed for a quick alternative to copying and pasting the information by clicking 'Cite this book'. This was convenient and saved a lot of time. To practice using EndNote and attempt to understand how it all works, I decided to add a few of the other resources that I had explored throughout this task. After entering a few into my EndNote library this had given me the confidence I needed in use the program. 
My EndNote library

Now to begin my screencast, I needed to first delete the reference entered into my EndNote library in order for me to be able to re enter it whilst recording a screencast video. I thought this would be a simple task, such as just clicking on the book and putting it into the EndNote trash bin. For some odd reason I could not appear to get this to work. I tried various ways; highlighting, clicking, dragging, but I could not remove my resource from my library. I was puzzled and I was sure it must be something really simple I was doing wrong, so decided to click on the EndNote Help tab is search of some answers. Nothing! I therefore decided to create a new EndNote Library and copy my resources across into the new library. Time consuming, and seemed pointless but it worked.

I began my first ever attempt of a screencast, and it was a disaster. I clicked on the Video icon and was unaware that the video automatically started recording after 3 second countdown and I was not ready. I carried on anyway to practice but also found that I rambled on, and ran out of time before I even got to talk about my word document.

I decided I needed to write a script. I had another look at the two sample videos on the LMS created as a guide and went from there. I thought having a script would make things a little easy but in fact I found that I was so busy trying to follow what I had written on my pieces of paper I was forgetting to actually carry out the actions on the computer as I went and kept hesitating. My screencast appeared out of sync.

I was unhappy with my first attempt at a screencast video, it was frustrating and now I was even more annoyed that I would have the same problem as before trying to delete my reference from library. I tried to have another go at this again and amazing by default worked out that I simply just needed to close down my EndNote library and reopen it an it all worked as it was suppose to. The reference was gone had I could now have another go at my screencast video.


Wednesday, 3 April 2013

Choosing a screencast technology

Today I watched a tutorial in which Dani described how to use Zotero to reference your researcher resource.  This tutorial gave a good overview of this screencasting technology and how it can be used to reference an article type resource. This gave me my first insight to screencasting, how it works and what it can produce. It also reinforced what I was required to produce for Task 2.

Zotero and Mendley are both web based technologies and therefore I thought I would explore this option before trying out one that required downloading. I was quite interested in using Zotero as I liked the way in which in takes a screenshot of your resource. Unfortunately as Dani had mention at the beginning of this tutorial, although Zotero is also a free online technology, Zotero requires Firefox as your web browser. I already have Safari, Internet Explorer and Google Chrome on my Mac and did not want the inconvenience of downloading yet another web browser so decided against this option.

I continued searching, exploring the links and reading over the material provided on the Technology Toolbox for Educators and decided that I would trial Jing. 


Tuesday, 2 April 2013

FindIt vs Google Scholor


Google (general) had proven to far too broad in terms of me searching for a suitable book type reference. This was very time consuming and I felt that I kept getting distracted and steered off track looking at other resources types and interesting sites, rather than focusing on my chosen resource type. 


It was suggested that I did a search using Google Scholor. Google Scholor allows you to search across literatures from multiple sources and explore related works such as articles, books, abstracts.  Although I did find a couple of suitable books by searching with Google Scholor I still found it time consuming searching through large numbers of resource types when I was only wanting to focus on a book type reference.


I remember after listening to one of Jenni's lecture this week that she had mentioned the Murdoch Library FindIt and that this would usually be her first point of call. Again, I carried out a search ' Art education technology'.

Benefits of using FindIt:

- Able to define my search, search just for Ebooks.

-Enables me access to full texts, unlike Google Scholor where you only have access to some, an abstract or a paragraph taken from a book.


Changing Resources

During the last few days, I have spent what seemed to be endless hours searching the Web in desperate attempt to find a resource. Commencing Task 2 I was really stressed and hung up about my decision on resource type. I was under the impression that the book type resource had to be an Ebook. After hours searching I had even considered changing my resource type because it appeared that each time I was carrying out a search using Google I was coming across many other interesting resources types, but only limited Ebooks. This became frustrating, tiring, and I began to doubt my choice of book type resource.

Eventually I stumbled across an Ebook from Apples Itunes store. I thought I had found the perfect resource! It was a multi touch Ebook aimed at teachers,trainees who teach children between the ages of 6 and 12yrs. The books summary states that it presents ideas for using technology to teach art and design. This was exactly what I was after. However, Apples Itunes store provided limited information about the book for me to cite and be able to reference.  I then realsed that I would not be able to preview this book to find out more information as a requirement is that this Ebook is that it is only available for Ipads.
Screenshot taken of my first chosen resource Retrieved form Itunes Stores.
I spoke with both my tutor and unit coordinator who reassured me that ANY book type resource would be adequate as long as it relates to how technology can be used in Art, and most importantly, it didn't have to be an Ebook. Any book type resource was acceptable!

For some reason, I couldn't get past this and was being very indecisive about the resource itself and wasting valuable time. It was explained to me that the resource itself is not the important aspect of task 2, and that I was reading far too much into things. I thought this book would be fine.

I liked the Ebook that I had chosen, although after reading back over my UILG and discussions I had with my tutor I was still concerned that I had not found this resource using an appropriate research repository merely by default so decided to seek an alternative.

It was suggested by my tutor that I try searching through Google Scholar as apposed to Google general. I might have more success this way.

I took the advice of my tutors and carried out a search with both Google Scholar and the Murdoch University Library(FindIT). I preferred this as it allowed me to define my search and could view full texts. Why I hadn't just done this in the first place I dont know. By searching Art Education and Technology I came up with lots of suitable books. Here i found my chosen Resource 'Teaching Arts and Science with the new Social media'.

When viewing my resource, I noticed that it also allowed me the option 'cite this book' which later would save me time having to copy and paste the information into my EndNote library.

Screenshot Taken of my search using FindIt, Murdoch University Library.


Sunday, 31 March 2013

Downloading and understanding Endnote

Before beginning this assignment, I had already downloaded Endnote onto my computer from the Murdoch Library. Endnote I now know is a referencing software that is offered to all Murdoch University students for free. Initially, I had downloaded Endnote early, on commencement of my units, after reading somewhere on the external studies information site that this would be required as part of my studies. I wanted to be organised and prepared. I had intended to research and play around with it to see how it all work before now but hadn't actually got around to it. I didn't really know anything about this software, only that somehow it was meant to help me with writing my assignments throughout my time at university. The Endnote download was easy to find and instructions where clear and simple to follow.  Although, now it was successfully downloaded onto my computer, I did not have a clue what I was actually meant to do with it. I had noticed that it appears when I open up a word document, but I was not sure how to use it.

Task 2 instructions 'Learn how to use Endnote to store and cite references'. I was excited I was finally going to learn what Endnote is, and what it is used for. I went onto the LMS whereby we were told by our tutors we would find the Endnote link to download, guidelines and any relevant information regarding this referencing technology. 

The technology toolbox for educators is packed with some great resources, it contains so much useful information. Sometimes I feel a little lost and overwhelmed by it all and dont really know where to begin. Although once you find your way around, it is relatively straight forward to navigate around to find what you are looking for.


Under referencing, on the technology toolbox for educators site, there is a fantastic link to the You Tube Endnote training channel. I found this most useful as a visual learner. I find by watching tutorials this is a way in which I learn best, as opposed to large amount of written text or instructions which can be sometimes hard to interpret.

I feel now after watching a few various different tutorial videos I am confident enough to begin Task 2, first find a suitable resource and learn to use learn to cite and reference it with Endnote.

Friday, 29 March 2013

Live Classroom and social media groups

Beginning Task 2, I was feeling disappointed after finding out that our Live Tutorials for external students would now be held between 8- 9pm WA time (9.30pm for me in the Northern Territory). Unfortunately, a bit late for me. I don't want to miss out as these tutorials really helped to motivate me throughout the last task, and helped with clarification of the task itself. It made me feel involved and allowed me to be able to contribute. It was nice to have that connection with my peers and the tutors.

I was assured that these tutorials would also be recorded and I could therefore watch the archived session.

Discussions that have been brought up in Facebook and the EDN113 Skype group have allowed me to interact with my peers and provided me with that all important interaction that can sometimes be limiting as an external student. These groups have allowed me to feel connected and inclusive as part of a group.


Yesterday (28th March) I had a dicussion with a couple of my peers in our Skype group about our initial understandings of task 2. I had being feeling a little hesitant to begin with about starting task 2 as I had felt slightly confused about the resource and what we had to write in our word document. These online discussions have given me the reassurance  I needed from others and  the confidence knowing that you have interpreted the task as others have.


Wednesday, 27 March 2013

Authentic Learning and Introduction to Task 2

I have just finished watching this weeks lecture on Authentic Learning which also gave an overview of Task 2. I found it very interesting as it talked about the technology being used as a cognitive tool. It made me consider the way in which we have been learning throughout this unit and what it means to provide authentic learning. 

In task 2 we will be learning how to use Endnote to cite and store references, and learn about some screencast technologies. Instead of using technology to present already known information, we will be using technology as a tool, learning as we go. I definitely want to find the chance to read over more of my unit text.

Jane L., Howland, David, Jonassen, & Rose M., Marra. (2012). Meaningful Learning with Technology (4 ed.). Boston: Pearson Education.

The lecture has made it clear the requirements for task 2. I am now feeling more confident about the task ahead of me and am looking forward to progressing. It has also highlighted some minor problems some people were experiencing when it came to downloading EndNote, which I was totally unaware of. I  feel this is always useful to know for future reference.

Some of the suggestions made in this weeks lecture were to firstly to attempt to try out various different means of problem solving.  I am going to consciously take this into account when carrying out my research for Task 2 and instead of just using the LMS to post discussions and problem solve use a range of different learning strategies such as discussions through different social media, (eg: Skype, Facebook), emails to my group members, and seeking solutions from lecture materials as well as communicating with my tutor and unit coordinator.

After watching this lecture I have also decided it would be beneficial for me to join up to the Dingo group for pre-service teachers. The online library provides stacks of useful resources and reading material related to this unit.

Monday, 25 March 2013

Task 2: The researcher, Initial confusion

For Task 2, I am required to explore technologies that relate to my work at university as both a learner and researcher.

March 24th, Admittedly at this point in time I had not had the chance since our last assignment to properly read over the requirements for Task 2 in our UILG. Stupidly, without reading the task requirements, I panicked after seeing the announcement on the LMS and that my peers had already began signing their names up on the Google Docs spreadsheet created for External students.  


I didn't want to miss out! I really wanted to choose art as this is my favourite subject and would like to specialise in this area of study after graduating. 

I had to pick one of the following resource types; a book or Ebook, a Journal  article, a website, blog or wiki or a video / audio podcast. Great I thought! I have already created a website, I wanted to try something new... I don't really like having to make videos and a journal article I thought sounded boring. I would love to design and create my own childrens Ebook!  Only I was soon disappointed then reading what I was actually required to do for this task in my UILG. I wasn't going to be creating a book at all... only research and reference it. Never mind

After finally clarifying what it was the task was asking me to do I headed straight for Google in search for my resource, only to find after many hours searching endlessly I realised it wasn't actually clear to me what I was looking for... I have started to get very frustrated and have wasted valuable time not knowing what I was looking for. I have been feeling lost, with what was meant to be a straight forward task with supposedly clear instructions. 

sought the advice from both my tutors in hope of  shedding some light on my confusion with this task. I was feeling pretty miserable and embarrassed  knowing that I was actually making this task far more complicated for myself than it needed to be.

Time to re think and collect my thoughts! 

First things first, what is it I am actually searching for? My discussions with my tutors did clear up some of my confusions, however I still was lacking the confidence I needed to pursue with this task.

I am starting to realise how important it is to keep up with the online discussion boards and the need to have regular communication with your peers. Before going any further with this task, I decided to seek others interpretations of this task in order to clarify in my mind what it is I am trying to achieve.


Wednesday, 20 March 2013

Peer Reviewing Complete!

From what I have observed on the discussion board during the course of the weekend, quite a few of us 'external' students submitted their work early for peer review. Initially on the Saturday when I heard people had started to do this, I panicked. I wasn't quite ready I thought and was concerned that, what if mine didn't get a review?!

I put my draft up for review late Sunday afternoon.  I wanted to put it up early incase I came across any problems or experienced any technical glitches uploading my site onto the peer review system.

By Monday afternoon I was happy, relieved that I had submitted successfully on time and had already received three reviews from my peers!  All of which gave relatively positive feedback. So thank you to those three people!

Reviewing my peers sites has overall been highly rewarding, although challenging. A good learning experience I believe for us all!

I was very hesitant to begin with and conscientious about how I would go about phrasing my feedback. I didn't want my reviewee to feel that I was being negative towards their site, but I really wanted to give honest constructive feedback that could potentially help improve their work, if required. 

I was told once by a teacher 'For every negative you should give two positives'.

My first reviewer started by giving some nice positive feedback. Their feedback was very constructive, and after a little further research I was able to answer their query. They posed a question relating to whether the technology was equally compatible with Windows and Mac users. 

I was a little confused by this feedback to begin with as I had mentioned on my social resource page that the reason for choosing Keep Recipes as my technology was that... 

'Keep Recipes does not exclude anyone, no matter whether they are using PC or Mac.'


After researching the topic further I discovered what they had meant. "Do they only have a video for Mac users?"  I had overlooked the fact that the You Tube link provided instructions using screen shots from a Mac. The reviewer queried whether the same instructions were valid for PC's.

I jumped onto another computer (PC) to test out what happend when I tried to follow my instructions and the YouTube link. In doing so I found that  the instructions worked for both systems, but found slight glitch that PC users may come across. 

When dragging the icon...              


into your favourites bar (I was using Google Chrome on a PC) the tab or link appeared as


rather than


The icon still worked however was not clearly labeled to resolve this I simply used the alterative text link


and it worked fine! I have learnt from this that I will need to make a note / comment somewhere on my social site to inform PC users about this.


My second reviewer commented: 

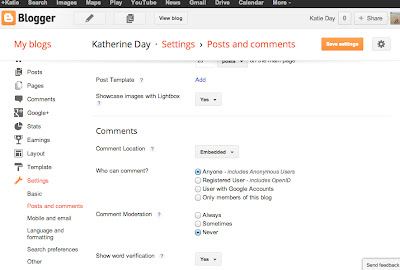
Again, initially I was confused, I found this comment a little unclear. I am not quite sure what they meant. So I revisited my website.... then my Blog. I looked down at the bottom of the page to the comments page and understood what they had meant.  I know other people have been able to make comments before, there must be somewhere in the settings I can change this.


In my Blogger Settings I found an option to
change these settings, now anyone is able to make a comment on my blog! Thanks for this feedback!

My third and final review was quite positive and did not alert me to any significant improvements or changes to my site.

Given access to constructive criticism through peer reviews has led me to place myself in the shoes of the user.This has ultimately led to refinement and improvement of my assignment.


Saturday, 16 March 2013

Week 4 Lecture: Peer Reviews

I have made it to the end of week 4. My website and social resource are now due for peer review. I am feeling pretty nervous about this. The week 4 lecture on peer reviewing was very useful. It gave me a clearer understanding of what to expect from my peer reviews and how to give constructive feedback to my peers on their website and blog.

In the previous  week 3 lecture we were provided with 3 examples of hypothetical sites, created by our tutors. (E-portfolio:sample 1, Mr Parkers e-portfolio and EDN113 Sample Site 3 Part of a live classroom tutorial this week was going through these examples and assessing them against what we thought they would get marked as using the marking rubric. I found this exercise beneficial as it made me look harder at my own website, and whether or not I was addressing the criteria.

PDF Instructions

I am now at the stage of creating my PDF instructions. I began by doing this in a word document. I initially thought this is to be the most obvious choice, as I can convert my instructions into a PDF for my website. However, I found this to have its pitfalls, particularly when adding screenshots. Word would reformat and move text around the page. I have been struggling to make it visually appealing. I have decided that a template would make this task simpler, and create consistency across all the pages. I have decided to try using Powerpoint to assist me with this job. 

Although I was a little unsure whether you could convert a PTX file into a PDF, the only way to find out... was to have a go! Success!  I can now use the same template for each of my pages, text size is set to the same across all pages, and title was formated. All I do now is simply type my text in the boxes and insert a picture.

I had already pre prepared, knowing that the task required me to include screenshots as part of my instructions. When I initially set up my Keep Recipe account, I took many screenshots of  each page as I went along. This was a good idea as it has saved time now and I don't have to go back into each stage again of the sign up process. I hope that by providing plenty of visuals to go along with my instructions, it will make it clearer to my peers how to go about using my social space, and how to contribute. The site allows for many different options for signing up and later, sharing recipes. Instruction will be included for various sign up options.

23 slides later, I am finally done! Or so I thought. I logged into my Weebly account, hit the upload file icon.... FILE TOO BIG! I was gutted. I had just discovered that one limitation of Weebly's free software was a 10 MB upload limit. Want more? You pay.

I searched through the settings in powerpoint. I knew that in some programs you could reduce image quality etc, and therefore file size. I asked my partner for some advice as he had mentioned that somehow he managed to achieve this a few days ago, but on a Microsoft program... No good when I am using a Mac! I couldn't find any options for this anywhere only to compress the file which I didn't really understand.

I searched around my Weebly site '"There is always a way of getting around these issues, you just have to search for them" my partner told me. Right, I thought! I have got this far, I will not be defeated!

I my search for a solution, I discovered the 'embedded document' icon on my Weebly site. I did not have a clue what this meant, but it may have been the answer I was looking for. A question for Google... "How to embed a document using Scribd?"


I found my answer...  

HTML embed code
The easiest way to embed a document on your website is to use our HTML embed code. Open your document and click Embed in the Share and Embed section to find the code. Paste it into your site's html source, and you're done.

I uploaded my PDF document onto Scribd, this gave me the option to download the file? I was a little confused as to why you would do this when I have just uploaded it. But I clicked on the download file button anyway... to my amazement the file was now small enough to upload!

Although by complete accident, my experimentation had killed two birds with one stone. I had reduced to the file size, and learnt to embed a document onto my site. For me this was a great achievement and I was really excited that I was able to accomplish this! I was so proud!  I love this program!  I thought the options of a scrolling document or slide show feature was amazing,  so I have decided to have both options available on my website. I like the concept that  I could offer my peers the option of  viewing my instructions through a scrolling slide document on my social resource page, without the need to download instructions if they do not want to.